A Made Floral Recipe (with flowers!)
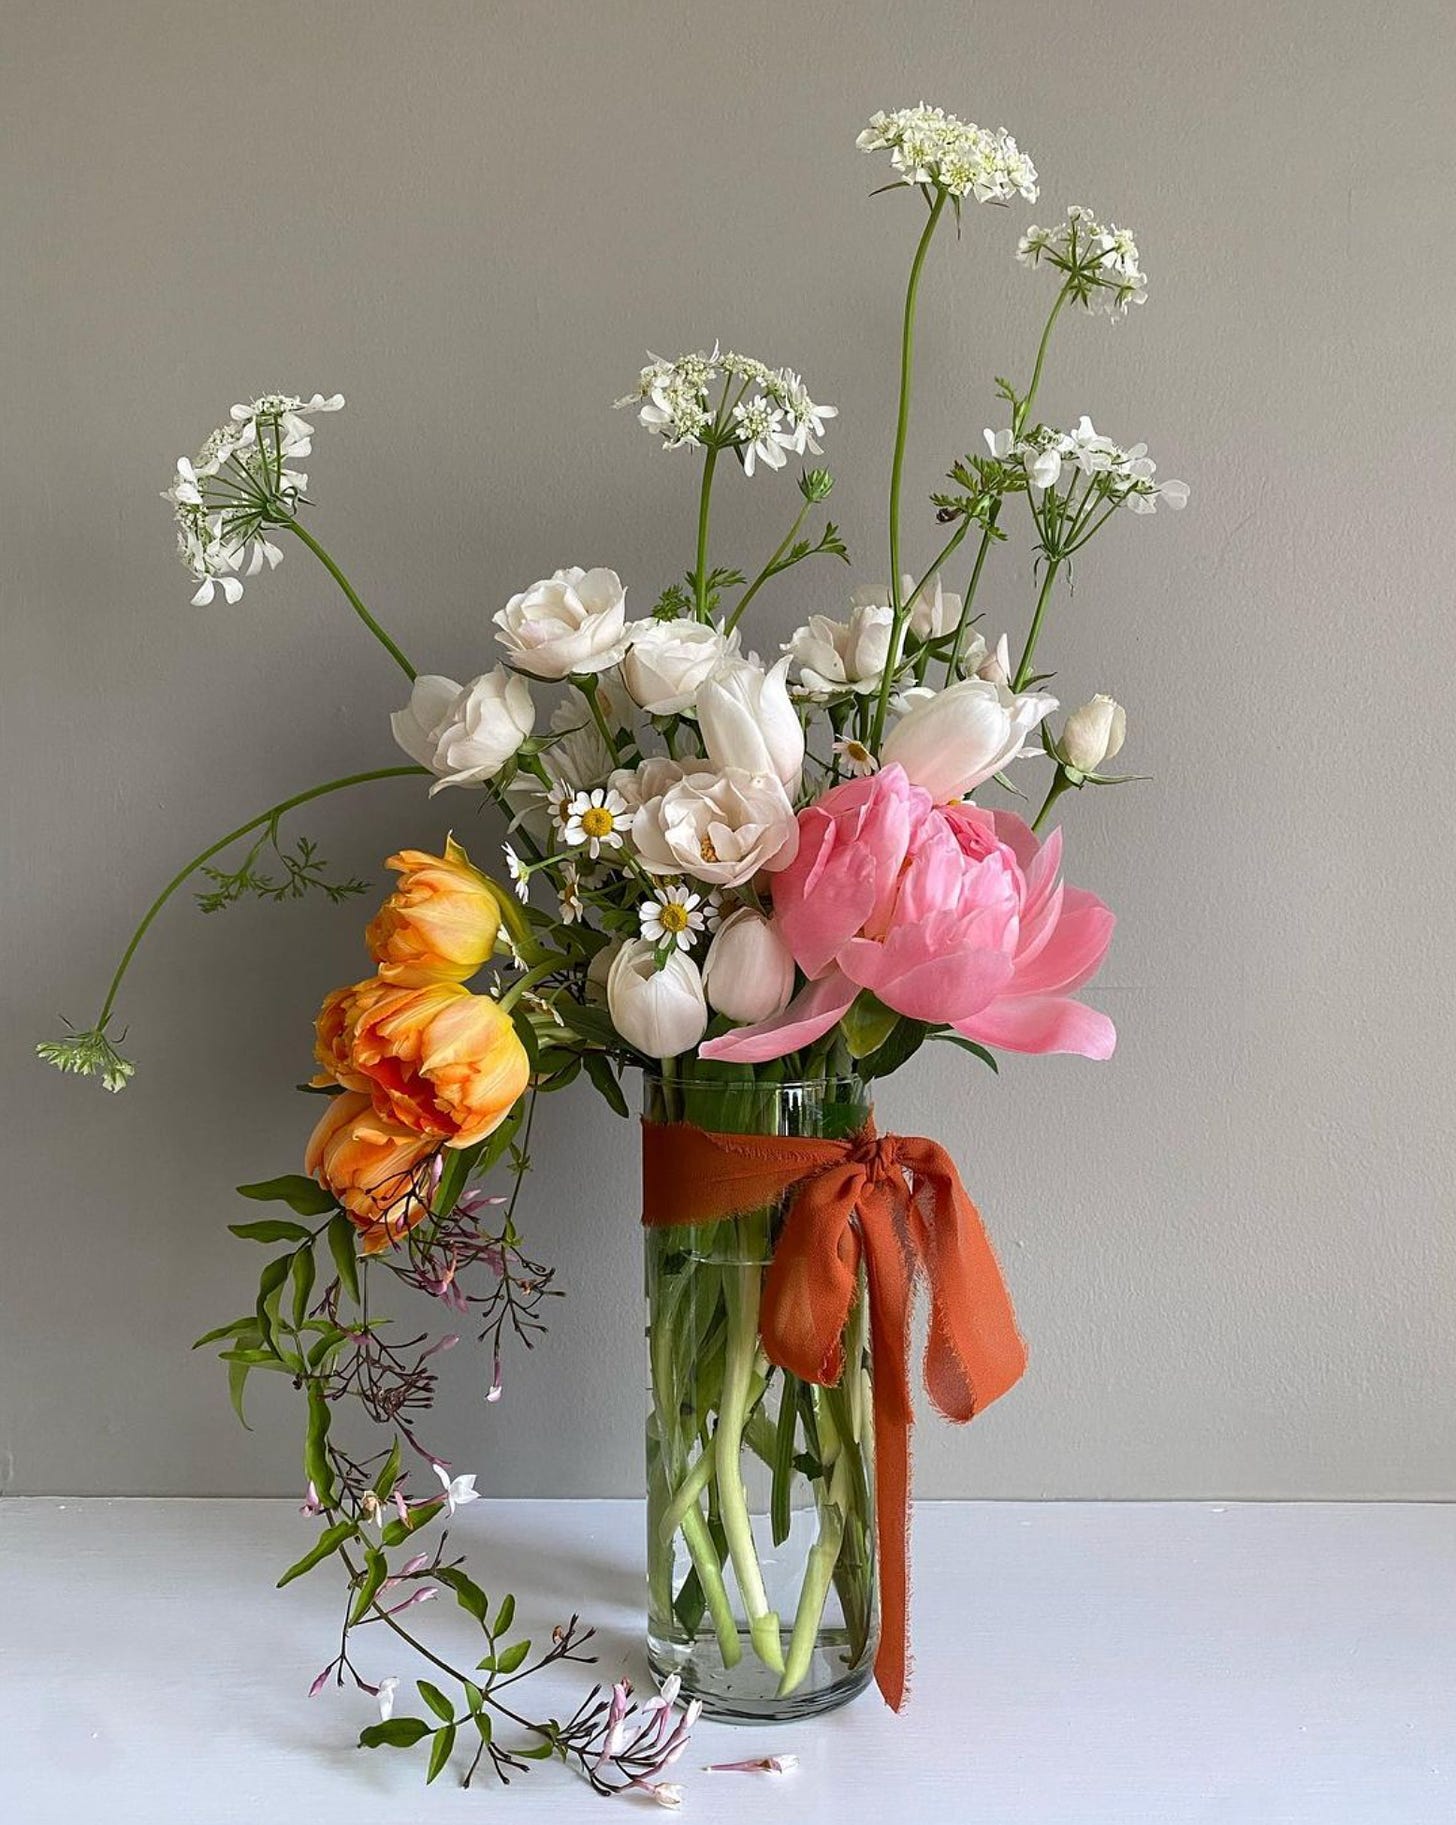
Let’s talk flower recipes. In this post, I break down the ingredients, assembly, and care of a flower arrangement made by me. This recipe will shed light on a variety of my decisions so that you can put these concepts to work in your own arrangements.
First, what is a flower recipe? A flower recipe is a list of flowers, quantities, and flower colors, along with guidelines for assembling the flowers in an arrangement that will really last.
As a floral design business, there are many reasons for creating a flower recipe. One reason is budget: the only way I’ll stay afloat is if I make a profit, and a recipe keeps me on track. Another reason for building out a flower recipe is to ensure that I have all the necessary items at my fingertips when it’s time to design. Once I have all my ingredients present, within budget, I’m ready to design.
If you happen to be practicing floral design at home or brushing up on your skills in the studio, a floral recipe can also expand your creative vision and introduce you to new flowers and design elements you hadn’t thought to work with before. Play, experimentation, and intuition all play a role in my work, but I’m always surprised at how liberating and expansive it can be to work within the limits of a recipe.
The Recipe
Step One - Ingredients, Quantities, and Color
1 stem coral charm peony
5 stems orange double tulips (novelty)
5 stems white tulips
3 stems white majolica spray roses
1 stem white button mum
1 stem chamomile
2 stems Queen Anne’s lace
1 stem jasmine vine
1 (20”) long piece of ribbon in pumpkin orange
1 (9” tall x 3”) wide glass cylinder vase
water
Step Two – Assembly
Remove all excess greenery on the stems of your flowers that will be in water. Leaves and foliage in the water creates extra bacteria and dirties the water quickly, leaving your flower stems to drink the dirtied water. Cleaning the leaves of each stem will keep the water cleaner for longer and allow for the stems to drink clean water, which helps to extend the vase life of each flower.
Next, start with the largest flower in my ingredients — the peony. I like to start with the largest flower to allow it to take up space. I tend to do this often, adding in the more substantial flowers first so that they don’t crush any of the delicate stems. Give the peony stem a diagonal cut, and place it in the vase off to the right. Always make sure that all your stems hit the bottom of the vase. The stems tend to grab onto the bottom of the vase and help keep the stems in place.
Collect the orange tulips in your hand so that the heads are relatively at the same level and then cut each stem on a diagonal. All your stems will be cut on a diagonal. Tulips tend to droop a bit, so I cut the stems with extra length so that the tulips cascaded off to the left of the vase. Adding in the orange tulip stems, with their leaves (exception to the no-leaves-in-water rule), helped to fill the vase so that when I add in other stems, there is already some tension in play within the vase.
You’ll notice that I started with the two types of flowers with the most color and that the rest of the stems are in white. I placed white in between the two dominant colors to create a place of visual rest. Adding white to the arrangement helps the two dominant colors stand out instead of blending in. This is done on purpose so that your eye travels to the coral charm peony and the orange double tulips first. They both act as focal points.
Place the following white flowers — tulips, spray roses, mums, and chamomile — within the vase to fill any open spaces.
Add the Queen Anne’s lace with some height. I love to create negative space within an arrangement. We’re able to do this by creating a base of floral, like we just did, and then adding in florals that will stand tall. The lines and shapes created with the Queen Anne’s lace help give an overall lightness to the arrangement.
Add the jasmine vine stem to follow the curve of the orange double tulips. The space between the jasmine vine and the vase creates an arc that draws your eye around the arrangement to the bottom of the vase and back up to the main focal point.
Lastly, I added a bow to the vase and tied the knot off to the right, opposite the orange tulips to give balance, and near the coral charm peony to reinforce the main focal point of the arrangement. I don’t always add bows and ribbon to my flower arrangements. I tend to do this when I am working with glass and the proportion of the arrangement feels off because the vase is too skinny. Adding a ribbon with a bow helps give an added layer of texture, like adding a jacket to a mini dress.
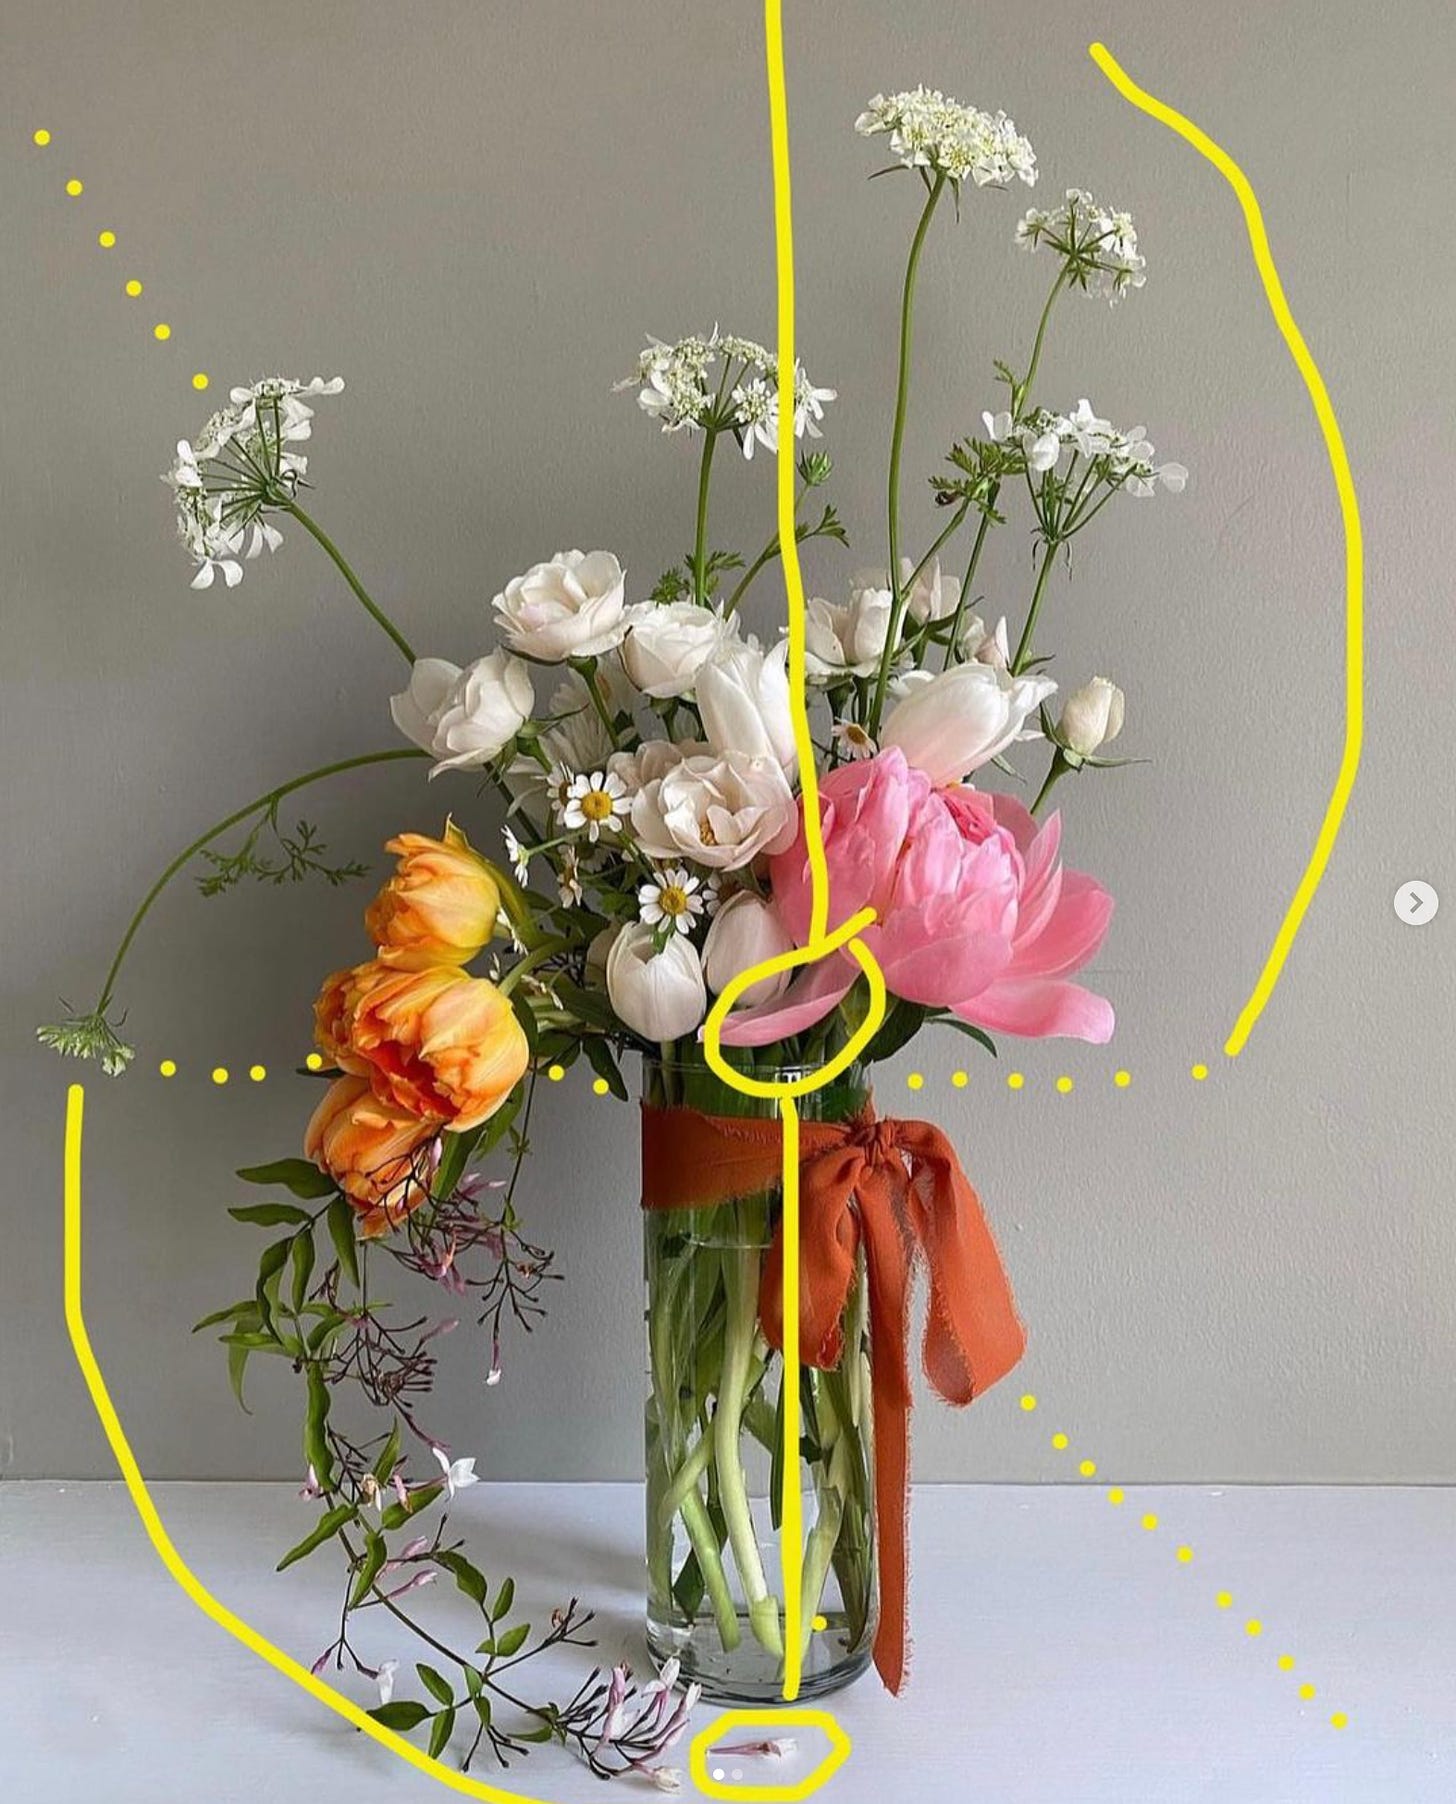
One day, my best friend doodled on this arrangement and sent it to me. I thought it was so cool to see her markings, and kind of analyze the arrangement in a visual way. She recognized the focal point — the coral charm peony and the ribbon. The curves all emphasize the lines and shapes I am creating with the Queen Anne’s lace and jasmine vine. There’s a sense of overall balance, proportion, and symmetry. In her iPad doodles, the lines and shapes created instantly reminded me of the Vitruvian Man drawing by Leonardo da Vinci, which aligns art, mathematics, science, and naturalism. This famous drawing and the golden ratio remind me of the exact thing that we strive for in our art, fashion, and spaces. That perfectly imperfect balance that draws enough interest in and makes you want to stay for a while.
Step Three - Care
Keep flowers away from heat sources and the sun! Unlike plants, fresh flowers don’t like to be warm and in the sun. Sanitize your vase every couple of days by using regular soap and water. Give your stems a fresh cut on a diagonal before placing in fresh water. An arrangement like this can last up to a week if given proper care.
If you’ve been following along, you’ll see that I talked about using the product Finishing Touch on every arrangement that I make in my last post about tools that I can’t live without. Spray your arrangement with Finishing Touch. It’s the only form of flower food that I use for my arrangements and it works!
Key Concepts
Many of the design concepts making this simple arrangement work are actually quite rebellious. But they’re rebellious with reason, and each element cooperates with the others to make a light and lovely composition. Here are some of the key concepts at work in this design.
Let the flowers be themselves! From the loose petal of the coral peony to the droopy vibe of the orange tulips, each flower in the arrangement is doing what’s in its nature to do. This not only creates the impression of motion among the flowers but of aliveness inside each one of them as well.
Embrace “imperfection.” Notice how a few shorter white tulips seem to cuddle together behind the peony or how the Queen Anne’s lace shows so much of its stem above the larger flowers below. These details may not be what our mothers’ florists would have envisioned, but this arrangement is full of delightful surprise. It’s too easy to become intimidated by the idea of hard and fast floral design rules and to imagine a perfect formula for selection and arranging. There simply is no one formula, and look what happens when we let go of such illusions!
Inspire the eye to keep moving. No matter the vase, a variety of flower types, shapes, and colors can be selected, cut, and arranged in a way that establishes one or two focal points and keeps the eye curious.
I hope this recipe breakdown has been informative and that you’re feeling inspired to try this one or build your own!
A note on wholesalers, ordering, and recipe building: Sourcing flowers for just one arrangement is close to impossible. Flowers at wholesale markets are typically sold in bunches of 5 stems, 10 stems, or 20 stems. For example, to use 1 coral charm peony in an arrangement, I need to purchase 5 stems. Because I design for weddings, events, and subscription deliveries, I’m always making more than one arrangement and the bunches of flowers I purchase can be spread out among them. I always have my arrangement recipes built out before I place the order with my wholesaler. Building recipes can be time consuming, but I use a template that helps me order the exact amount of flowers needed, within budget, and from the appropriate wholesaler. The formula is complex, but it’s an excellent tool to map out large flower orders while compiling stems of flowers that costs dollars and cents. It’s taken me a while, and lots of trial and error, to develop it and if you’re interested in viewing how I put together large flower orders, let me know!


